Painting German tanks
Camouflage

In the previous article, we have selected paints, which we'll need at the beginning of our adventure with painting German armored vehicles. We have already chosen primary colors, now we will learn how to use them in a challenge with a brush, airbrush, and our model.
A few words about primer and base color.
Before we paint our model, we must remember to prepare it properly. First of all, we need to ensure that our model is clean. It must be decreased for the paint to impose well. The best method of cleaning our model before painting is warm water and either soap or dishwashing liquid.
Next step is foundation paint. It is very important part (especially if we paint with acrylic paints) as the layer acts as underlay, it slightly changes the surface of the model and allows paint to adheres better. We have a lot of primers to choose, both in spray or jars. The most frequently used colors are black, white or gray. Your choice is quite important, as darker the base is, darker your model will turn out. We recommend using dark primers for dark colors, and lighter ones for bright ones. Some manufacturers offer primers and paints in spray or in pots dedicated to specific vehicles, aircraft or camouflage type. We will be primarily interested in those three that we have already chosen: Panzergrau, Dunkelgelb and Rotbraun.
Brush
There are 3 methods of applying primers: with brush, spray or airbrush. The first one seems to be the easiest but requires a lot of work and accuracy. If you use a brush, you must remember to dilute your paint well, to prevent it from leaving any unwanted marks or stains on your model. Sometimes painting must be repeated. Remember that if primer "does not catch on" the first time, and plastic is still visible from beneath primer, you do not correct this immediately. Wait until the paint is dry and repeat the action. This will help you avoid problems with streaks or beads. Painting primer with a brush has also other drawbacks - we will not be able to use more advanced techniques, such as color modulation primer.
Best primers for brush, are those based on acrylic lacquer, for example, Tamiya Surface Primer or Mr. Surfacer from Gunze (Mr.Hobby). In order to avoid traces of the brush, we dilute the primer in a ratio of 2: 1 (2 parts of primer to 1 part of diluent). We recommend using Tamiya Laquer Thinner, Mr.Hobby Leveling Thinner or oil paint thinner. Two layers of the prepared mix should be enough to prime your model properly.
Spray
In my opinion, the easiest method of priming is to spray paint your model It greatly accelerates and facilitates our work. We can immediately cover our model with chosen color (eg. Tamiya offers sprays dedicated to the German vehicles). You should remember that the paint must be applied carefully to avoid stains or blotches. If the model will not be covered after first time – wait till paint dries and repeat. It's better to paint 2-3 thin coats than one thick. You should also remember to use spray paints only in a well-ventilated area!
Spray also gives us more opportunities to work on the reflections of light on the armor. We can first apply a primer in black, then gray or white, spraying paint from one direction. As a result, by applying a base color in thin layers you can achieve simple shading effect. This technique is called Zenithal Lighting. It is easy to make and adds a realistic look to the model.
Airbrush
Airbrush gives us the broadest amount of possibilities when it comes to painting large surfaces. With its help, we can greatly facilitate our work at the beginning of our adventure with painting. It gives us opportunities to learn more advanced techniques of painting. Primer and first paint layers can be painted with several methods. First of all, we can apply primer with classical method, painting a model with one uniform color. We can also use Zenithal Lighting technique, described above when discussing sprays. But the showiest modulation methods are Colour and Panel Lighting.
For the first one, you have to choose several sources of light falling on the model. Then, according to our choice, we give all flat surfaces contrast, by making reflections at their edges. This method is more difficult than others since it requires the imposition of a few coats of paint, starting from the selected base color and finishing with brighter shades. With this method, our model gets more contrast and it attracts the attention with more vivid and bright looks.
The method similar to the modulation is the Panel Lighting. It consists in lightening the individual flat surfaces in the center. To achieve this effect, use several shades of your basic color. As a result, the viewer has the impression that the model is illuminated from all sides. Again, it attracts attention and greatly increases the contrast of the model.
Both methods mentioned above are often criticized as unrealistic, fairy, or even suitable only for fantasy or sci-fi models. In fact, lightened model seems very bright, but remember one important thing - at this stage, it is not yet finished. We still have to work with washes and weathering effects. Both will leave your model tinted and tarnished, which will make it less contrast, yet clear and attractive for the eye.
How to choose colors for these more advanced techniques? You can lighten your base color with white color, you can also choose a brighter color from the palette of the paints you use. If, however, you are only beginning the adventure with painting reflections, good idea is to choose one of the kits that are dedicated to the modulation method. Those are available from most of the manufacturers, such as Vallejo, Ammo of Mig, Hataka and AK.
Sample of painting methods - Jagdpanzer IV
To show you some of the techniques of painting with airbrush mentioned in our article, we took tank destroyer model in 1:35 scale from Tamiya - Jagdpanzer IV Lang. Below you can see subsequent the stages of painting.
 |  |
| First layer of primer | |

Base colour – Dunkelgelb +Rotbraun

Darker tone will give the model more depth

Painting with this layers of Dunkelgelb, skipping shaded areas

Model painted with Dunkelgelb, now it’s time for shading

Panel Lightning method on top and left side

Colour Modulation on the right

Paints used during shading process, basic color lightened with Vallejo Model Air 71028 and white

Normally we use one method while painting single model, we used few of them just to show you effect
Camouflage and masking
Our model is painted in primary colors, we can start working on the camouflage. In the previous article, we presented you different forms of German vehicle camo from the Second World War. In this section, we will focus on how to paint them using various tools and techniques.
Earlier, we learned the method of airbrush painting, that allows us to modulate the colors to create light reflections. We can paint the camouflage the same way.
While painting camouflage there are some useful accessories and materials for masking. Be aware of a very important thing, regardless of whether we use masking fluid, Patafix or tape. After painting remove them at the moment when paint layer is not completely dried. If the paint dries completely, removing the masking material can damage the painted element of camo.
Lines and spots
First German camouflage is a simple combination of colors Rotbraün and Olive Grün. Sometimes these colors occurred separately. Camouflage of this type can be painted just like base color was, with either brush, spray or airbrush.
Brush
To paint those simple masking colors with the brush we do not need to protect the model. First and foremost we will need a proper brush. For veins and lines, the best one is a brush with sharps, long and pointed bristles, because it will allow us to accurately paint the longer patterns. The flat brush will be most suitable for spots, allowing us to paint broader shapes. Working with a brush will require patience because we will apply several coats of paint. Why? For a smooth and natural transition, we need to dilute the paint harder than usual. Before painting, you should try out your paint mix on a piece of cardboard or placard. The paint has to be so diluted that it covers a thin layer of the painted surface and would not drain.
Spray or Airbrush - masking techniques
Using a spray or airbrush to paint camouflage requires us to mask the model. First, we must wait until the base color on our model is dry. If you are not sure that the paint will not be damaged during the subsequent steps, you can cover the model with a layer of colorless varnish. Next, you will have to choose a method of masking. There are many products on the market dedicated to this kind of work, but most suitable ones for that camouflage pattern are Panzer Putty, Patafix (or Bluetec) and masking fluid.
In the case of masking liquids we have a very wide choice (Humbrol Maskol, Mr. Hobby Masking Sol, Fluid masking Wamod, Vallejo Masking Putty), but the method remains the same. We need to paint all the elements which we want to remain in the base color with a thin layer of liquid. It would be the best to use silicone brush, which does not adhere to the liquid. Then wait until the substance is dry and hardened and then apply camouflage color. After the paint dries, gently remove masking fluid from the model. If you are making the tri-colour camouflage, repeat the operation with next color. Remember to wait till previous layers of paint are completely dry.
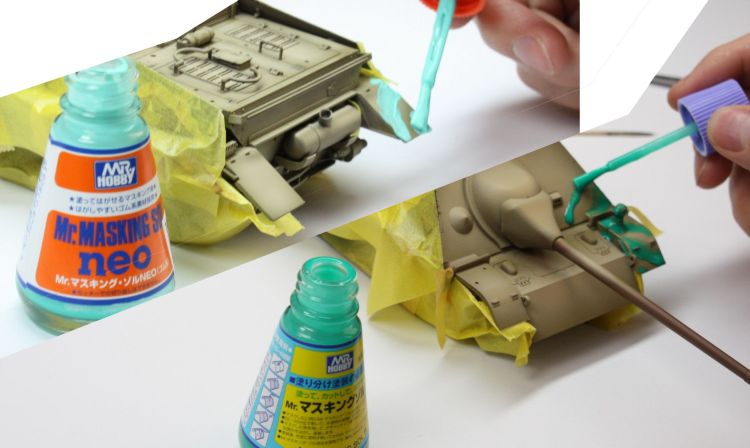
Liquids from the Mr.Hobby range have brushes, which helps a lot with an application of the fluid. Above two fluids of the company:
- Mr. Masking Sol Neo - thick liquid acetone-based, has a quite unpleasant odor. Dries quickly.
- Mr. Masking Sol R - thinner, almost odorless and can be diluted and washed with water

Once the paint is completely dry gently take off the mask
WARNING
These types of fluids should rather be used only on flat surfaces. We do not recommend using liquid masking in places where there are many nooks and small outliers. Liquids (especially those rare) can run down into the hollows and the removal of debris after painting is very difficult and you may end up damaging surface you’ve previously painted. There is one downside of this method. To remove the mask, you will have to wait for the paint to dry completely. This will make camouflage edges sharp, as you will have to break structure of dried paint.
The second method is Patafix. It is an extremely useful accessory, which helps with many tasks. Patafix is similar to plasticine, however, is more malleable and has adhesive properties. You can mask the model as a masking fluid with it. However, remember to adapt the material to the surface well. The advantage of using Patafix is that you do not have to wait for the mask to dry. The painting process is identical as if you were using liquids. After the paint dries, peel off Patafix. Here's another useful feature - Patafix sticks to itself, so we can remove it from any surface with itself.

Masking base color.

When masking, you may also use pieces of paper, attaching it to Patafix.

Painting with Panel Lightning technique.

Now you need to mask brown color, and then add some greens.

Final result.
In the competition for the best way of masking, tanks wins Panzer Putty (or Silly Putty – Sprytna Plastelina). It has very interesting characteristics. First of all, it settles on the surface by itself, you don’t need to press it to the model as Patafix. Within a few minutes, it perfectly adheres to the surface, so there is no chance that the paint will get under its edges. This mass is less viscous than Patafixu, but it's hard to call it a disadvantage. It’s also very easy to remove. Another interesting feature is the fact that it absorbs paint and thus is reusable.

Putty slowly melts on the models surface.

We need to paint quickly, as substance is constantly melting.

As you can see, the effect is almost perfect. No sharp edges and smooth transitions
To paint the camouflage in the form of veins, we can also use the airbrush without masking materials. However, this requires skill and intuition, and a decent airbrush, which is why this method is recommended for more experienced painters. Before we paint the model it’s good to do some practice. For the training material, we can use a piece of cardboard or plasticard. When you learn how to do it properly, you can transfer your new skills to the model.
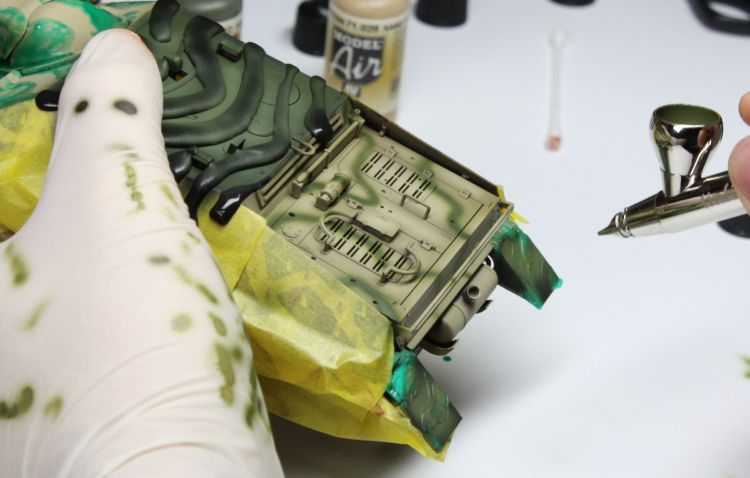
"Ambush" pattern camouflage
For this camouflage, we modify the first steps in painting from the previous section. We will add another stage, painting dots or lines on the camouflage colors and base. On yellow green and brown to green yellow and brown, and brown: green and yellow.
Brush
Here is the simplest thing. A method of painting colors Rotbraün and Olive Grün remains the same as in the first steps of brush painting. Well-diluted paint applied to the basic color. The difference will be camouflage pattern, in brown with green overlap, leaving the yellow line. Another step will be painting already mentioned dots or dashes. The principle remains the same: paint with well thinned, to obtain smooth transitions. To be accurate, be sure to use a small pointed brush.
Spray
It will be very hard to spray paint this type of camouflage, but it is not impossible. Prepare model as for a standard camouflage with the difference that leaves the space where we want to have dots or dashes unmasked. As a result, when painting successive colors we get desired results. Nevertheless, it may be difficult due to the wide nozzle sprays have, and a large flow of paint. The method is possible, but not recommended. Much more convenient and simpler will be painting patches of camouflage using spray and masking materials, finishing dots or dashes using a precision brush.
Airbrush
Perfectly suited for this type of work. Small nozzle (0,15-0,3mm) allows precise painting of small areas with thin layers of paint. Painting begins with masking model with fluid or Patafix. In addition to the planned out patches of camouflage leave extra dots or dashes, then paint the model in successive colors.
We can also paint basic camouflage colors around the hull of our vehicle first, and then apply the mask and make all the small elements in turn. We can use liquid masking, Patafix or masking tape, which we need to cut before applying it to our model to finish camouflage. This method does not require a lot of planning during the painting patches of brown and green. It is, therefore, simplest, although it devotes more time to mask your model. If we are not confident in our abilities, we can, of course, paint the smallest elements of camouflage with a brush.
Airbrushing is a simple, fast and fun, however, requires some practice. As mentioned before it’s wise to practice before you paint your model.
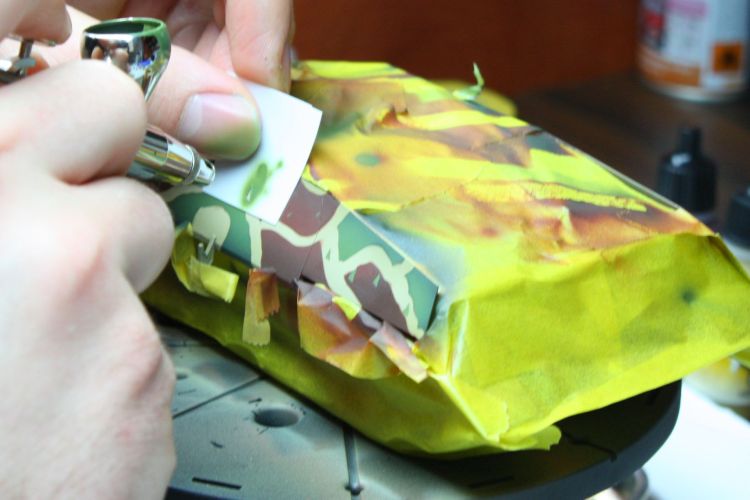
Painting small geometric shapes can be easily done using a template. In this case, I used a 0.25 mm plasticard, in which I’ve cut small triangles.
"Splinter” type Camouflage
The last type of German camouflage presented by us will be "Splinter". It is the simplest of all and painting it is very similar to all painting tools.
Camouflage
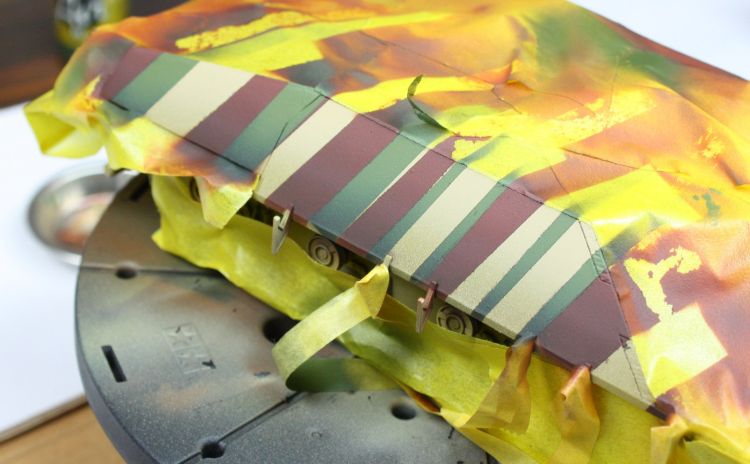
For this type of camouflage, it is best to use masking tape. Using liquid or Patafix is pointless because they won’t be precise. Simply stick stripes of masking tape to models surface in space, which you want to leave in basic color. Depending on whether you will be using one or more colors, the operation can be repeated after the first painting.
Brush
As with previous camouflages, appropriately diluted paint and several layers will allow us to easily achieve the desired effect. It would be best to use a flat brush, width depends on the scale of the model that you have chosen. Remember to paint with thin layers. This is even more important when we paint on the edges of the masking tape. Even if the tape is perfectly glued to the surface, any excess paint can soak it and cause an ugly bruise.
Spray and airbrush
After masking model simply paint stripes of camouflage, wait until the paint dries and remove the tape. Below you can see the whole procedure of painting with the modulation for each color.


News for vehicles in winter painting schemes: we’ve deliberately omitted white camouflage. Unfortunately, you will have to wait for the next article in the series "Painting models: German vehicles." You’ll find finishing the model, painting wheels, accessories, washes, and weathering.
If you read the whole article - thank you! :) We hope that these basic tips will be helpful in your projects. We will be pleased if this guide will spread to the wider community of modelers who begin their adventure with armored vehicles. Feel free to share and comment, and most importantly – happy painting to you all!
Don't miss the next part!
0
 en
en  en
en  pl
pl  en
en